
Learn how to edit an existing license in your CE Zoom (V2) pro account to update your license number, renewal dates, correct errors, or change the license status for the most current renewal period.
How to Edit a Current License period to add missing info, correct an error, or change status on CE Zoom (V2)
You can easily add or update license details, such as the license number, issue/expiration dates, or correct entry errors, from your CE Zoom Professional Account.
⚠️ ⚠️ Important: This article is only for editing a license to add missing information or correct errors for the most current renewal period.
If you have renewed your license and need to add the new renewal period, please see: How to Update a License After Renewal.
If you need to correct dates of past renewal periods, please see: How to Edit Past Renewal Periods
1. Navigate to the License Manager
-
From your navigation menu, hover over Manage Licenses.

-
Click Professional Licenses.

- This opens your License Manager page.

2. Select the License to Edit
-
Locate the license you want to edit.
-
In the Actions column, hover over Manage License and choose Edit from the dropdown menu.

3. Choose the Edit Type
-
Select "Need to correct a data error or add extension to the selected license/CE renewal period."

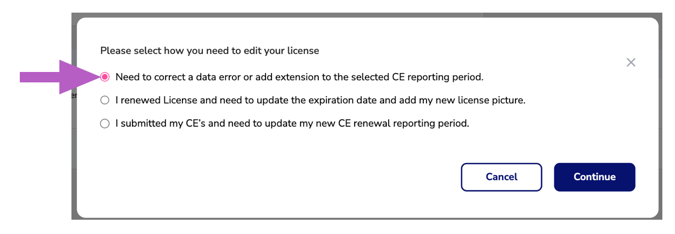
-
The other option(s) is only used if you recently renewed your license or submitted your CE's and need to update the new expiration date.
-
⚠️ ⚠️. If you have renewed your license and need to add the new renewal period, do NOT edit to correct errors - please see: How to Update a License After Renewal
-
Click Continue

-
Click Continue to confirm.

4. Make Your Changes
- Editable Fields in License Manager
When managing your license in CE Zoom, you may edit the following fields:- License Number
The unique number assigned to your license by your regulatory body. Enter this exactly as it appears on your license. -
The start date of your current renewal cycle, not the original date your license was first issued.
- Most licenses will display the current active dates issued by your regulatory body.
- In rare cases where your state always displays the original issue date, you’ll need to calculate the correct issue date by subtracting your renewal cycle length (typically 2–3 years) from the expiration date.
- Example: If your license has a 2-year renewal period and the expiration date is 6/30/2026, your issue date would be 7/1/2024.'
- Setting accurate issue and expiration dates ensures that your CE tracker can correctly allocate CE records to each renewal cycle and calculate your compliance.Issue Date
-
Expiration Date
The official end date of your license and or CE reporting cycle. This is the deadline by which your license must be renewed to remain active. -
License Status
Indicates whether your license is active, inactive, retired, or in another status as defined by your regulatory body. Updating this helps you keep your license records current and accurate. -
License Upload
Allows you to upload an image or file of your physical license. Having this on file keeps proof of licensure at your fingertips, making it easy to provide documentation when temping, changing offices, or responding to regulatory requests.
- License Number
- Editable Fields in License Manager
You cannot change the country, state, industry, or license name. If those details were entered incorrectly, delete or mark the license as Inactive, and then add a new license with the correct information.
More Info: How to Inactivate a License
5. Upload a File or Picture of Your License (Optional)
-
You may upload a file or photo of your license for your records.
6. Save Changes
-
Click Save to apply your updates.