
Before creating a bundle, make sure all individual courses (both live and self-study) are added to your CE Zoom account.
⚠️ Important Notes:
Courses that are part of a conference cannot be included in a bundle deal.
Single courses can be offered both as stand-alone purchases and as part of one or more bundle deals—giving learners flexible options.
A single course may be included in multiple bundle offers, allowing you to repurpose popular content across different themed or promotional packages.
More Info: How to add a self-study course
Quick Links to the Course Wizard Navigation Menu Item
Use the links below to jump directly to specific sections of the Bundle Wizard. These shortcuts make it easy to reference or revisit a step without scrolling through the entire setup process. Whether you're editing an existing course or checking details before posting, these quick links help streamline your workflow.
1. Bundle Name
Registration: Free Bundle
9. Registration - Basic Info - Attendees
Registration: Paid Bundle (One-time fee)
9. Registration - Basic Info - Attendees
10. Registration - Basic Info - Memberships
13. Price Options
14. Refunds
15. Tax
16. Registration Pricing - Sales Tax
17. Bundle Pricing
20. Layout
21. Agree to Terms and Conditions
22. Advertising
23. Posting Overview
How to Add a Bundle
- From your Company Dashboard, click the Create a Course button in the top right corner.. This will launch the course creation wizard.

Course Type
- Select Bundles & Packages, then click continue

Basic Information

1. Bundle Name
Type in a clear, descriptive name for your bundle. This is what participants will see when browsing or registering.
2. Bundle Overview
Provide a brief summary of what the bundle includes. This should highlight the purpose, number of courses, credit hours, and any other relevant details that will help participants understand the value of the bundle.
3. Bundle Prerequisites

Use this section to indicate whether your bundle has any entry requirements for participants (e.g., educational background, licenses, or prior coursework).

-
By default, the toggle is set to "No", meaning no prerequisites are required.
-
If there are prerequisites, switch the toggle to "Yes" to activate the text field.
-
In the field provided, clearly describe any requirements such as:
-
Minimum education level
-
Licensure or certification
-
Completion of specific prior courses
-
This ensures participants know if they're eligible to attend and helps maintain course quality and relevance.
4. Bundle Disclaimers
This section outlines the default disclaimer that will be included in your course listing.

-
The pre-filled disclaimer content, shown in blue and black text above the editor, is automatically included to inform participants about the scope and ownership of course content.
-
This protects CE Zoom, the presenters, and your organization by clarifying that:
-
Views expressed are those of the presenter.
-
Participants are responsible for applying the material appropriately.
-
Course content is protected and may not be copied or distributed.
-
Would you like to add to the disclaimer?
-
By default, this is set to “No.”
-
If you would like to include an additional custom disclaimer specific to your course or organization:
-
Toggle to “Yes”
-
Use the editor field to enter your custom language.
-
Your added content will appear in addition to the default CE Zoom disclaimer.
5. Country & Industries

- Choose Your Country
- Click the dropdown under “Choose your Countries”.
- Select the country associated with courses you want to include in the bundle (e.g., United States).
- Choose Your Industry/Industries
- Click the dropdown under “Choose your Industries”.
- Select all industries that apply to the courses included in your bundle (e.g., Dentistry, Hygiene, etc.).
🎯 Why this matters:
The selections you make here will filter your course list accordingly so that only courses from the chosen country and industries will be available for you to add to the bundle in the next step.
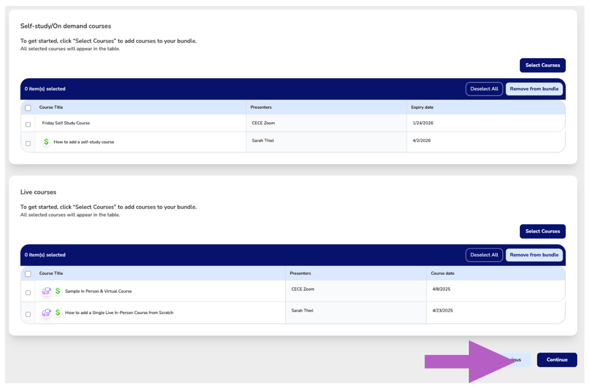
6. Bundle Content
This is where you’ll manage all the courses included in your bundle.
How it Works:
Courses will automatically be grouped into two sections:
-
Self-Study / On-Demand Courses
-
Live Courses
All selected courses will appear in their appropriate table based on the delivery method.

To Add Courses to Your Bundle:
- Click “Select Courses” under either Live or Self-Study sections.

- A list of all eligible and active courses for that educational method will appear.

- Use the checkboxes to select one or more courses you’d like to include.

- Click “Add courses to bundle.

- Repeat the process for the other course type if needed (Live or Self-Study).
✅ You can include both types in the same bundle.
❌ Conference courses will not appear, as they cannot be included in bundles.
- Once all desired courses are added to your bundle, click Continue to move to the next step.
7. Bundle Contact Information
Use this section to identify the primary contact for the Bundle and manage who should handle specific support questions from attendees.

-
Name and Email of Person Adding the Bundle
This will be the default contact for all bundle-related support unless otherwise specified. - Default Settings:
-
All categories are automatically set to “Yes”, meaning the person listed as adding the course will be the contact for:
-
Bundle coordinator
-
Cancellations and refunds
-
- To Assign a Different Contact:
-
Toggle to “No” for any category where a different person should handle that inquiry.

-
Then, enter the contact name and email of the appropriate person.
-
This ensures attendee questions are directed to the right person for a faster, more accurate response.
8. Registration - Plan Type
Choose how you’d like attendees to access your bundle. You can offer it for free or set a one-time purchase price.

- Free
-
Give attendees free access to the bundle.
-
Optionally, set an enrollment duration to limit how long they can access the content.
-
- One-Time Payment
-
Charge a single fee for attendees to access the complete bundle.
-
You can still choose to set an enrollment duration if you want to restrict access time.
-
Select a registration type to continue
Completing Registration for a Free Bundle
9. Registration - Basic Information

Fee Info
-
- The "Is this a free event?" toggle will be automatically set to "Yes" if you selected Free in the previous pricing step.

- The "Is this a free event?" toggle will be automatically set to "Yes" if you selected Free in the previous pricing step.
Attendees
-
-
Select all attendee categories you'd like to support (e.g., Dentists, Hygienists, Students).
-
These selections will allow you to assign pricing or access based on attendee type.
-
Once categories are selected, click Continue to move on.
-
Completing Registration for a Paid Bundle (One-time Fee)
9. Basic Info

Fee Information
-
- The "Is this a free event?" toggle will be automatically set to "No" if you selected One-time purchase for the complete bundle in the previous pricing step.

- The "Is this a free event?" toggle will be automatically set to "No" if you selected One-time purchase for the complete bundle in the previous pricing step.
Attendees
-
- Select all attendee categories you'd like to support (e.g., Dentists, Hygienists, Students).
- These selections will allow you to assign pricing or access based on attendee type.
10. Membership
If you would like to offer a special rate to attendees who belong to a professional membership organization, toggle Yes to activate the membership discount section.
Not offering Membership Discount (default)
Click, Registration Settings, to be advanced to the next steps

⚠ If your course is available to multiple industries, you will be asked to configure discounts separately for each industry.
Once membership discounts are enabled, you’ll be able to:
-
-
Select the membership organizations you wish to offer a discount to.

-
💡If the membership organization you need is not listed, please contact us at help@cezoom.com — we’ll be happy to add it for you.
11. Registration - Dates
These fields set the open and close dates for your bundle registration. Use the calendar icons to select your desired dates. The time zone shown here reflects the one associated with the company address.

Click inside the date fields to activate the calendar picker and easily select your registration open and close dates.
12. Enrollment Duration
By default, the toggle is set to "Yes" — meaning you can specify how long attendees will have access to the content after purchasing or enrolling.

If “Yes” is selected:
-
Set the duration by entering the number of years, months, and/or days the content will remain available after registration.
If you want unlimited access:
-
Toggle to “No”
-
This means the bundle will remain continuously available to attendees with no time limit on access.
13. Price Options

-
Select the Number of Price Tiers: Use the dropdown to choose how many pricing tiers you want to offer (up to 6 tiers). This allows you to control pricing changes over time (e.g., early bird, standard, late pricing).

⚠️ Important Note About Bundle Pricing Tiers
Unlike traditional event pricing—where prices typically increase as the event date approaches—bundle pricing may work in reverse.
With bundles, pricing can be more flexible and based on access duration or remaining content availability. For example:
💸 Early adopters might get a special introductory discount
💰 The price may then increase during the peak availability window
⏳ As the bundle nears expiration (fewer courses or less access time), you may lower the price again to reflect reduced value
This tiered strategy helps attract early interest, maximize mid-cycle revenue, and clear final sales before access ends.
-
Name Each Pricing Tier: For each tier, select a label from the dropdown menu (such as Early Bird Pricing, Standard Pricing, etc.). This label will be shown to attendees during registration.

-
Set Effective Dates: Use the calendar picker to choose the date each pricing tier is valid until. The system will automatically apply the next tier starting the following day at 12:00 AM.

-
Last Tier Timing: The final pricing tier will automatically extend until the course registration closes (as defined in the Registration Dates section).
14. Refunds

-
Choose the Refund Option
Select one of the following from the dropdown:
-
No Refunds
-
Attendees will not be eligible to receive a refund for any reason.
-
This is a strict policy—use this if you do not want to process any cancellations or reimbursements.
-
-
Refunds until set date
-
Attendees can request a refund up until a specific date you define.
-
After that date, no refunds will be allowed.
-
This is useful if you want to allow flexibility early on, but lock in registrations closer to the event.
-
-
Custom – Tiered refund dates
-
Allows you to offer different refund amounts based on when the request is made.
-
For example:
-
Full refund if canceled 30+ days before
-
Partial refund if canceled 7–29 days before
-
No refund if canceled less than 7 days before
-
-
Ideal for more complex or high-value events where costs increase closer to the event date.
-
-
-
Non-Refundable Admin Fee Settings
-
By default, Non-Refundable Admin Fee is toggled Yes, meaning a fee will be withheld on all refunds. If you do not wish to withhold a non-refundable admin fee toggle to No.
-
Non-Refundable Admin Fee Set-up
-
Choose Dollar Amount or Percentage

-
Enter the dollar or percentable value amount & set the Refund Deadline Date

-
-
-
Non-Refundable Fee Calculation
Choose how CE Zoom should calculate the non-refundable portion of refunds:
-
- Admin Fee: This is an optional, non-refundable fee set by the company hosting the event or course. It may help cover administrative costs such as setup, coordination, or additional support provided.
- Merchant Fees: This fee covers credit card processing costs. Please note, All merchant fees are non-refundable by Stripe.
- CE Zoom Fees: fee covers the use of CE Zoom's platform and services. These are non-refundable.
- ⚠️ Important: If you select Admin fees as the only non-refundable fee type and do not assign a dollar value to the Admin fee, a 100% refund will be issued in the event of a cancellation.
This means you’ll be responsible for covering both the merchant and service fees, potentially resulting in a negative net profit.
-
-
Add Contact Email
The contact email will auto-populate from your course wizard contact info from a previous step.
-
If this is not the correct email for refund inquiries, update it here.
-
-
Refund Policy Display
CE Zoom will auto-generate a refund policy based on your selections.
-
To add extra information or clarifying notes, use the “Add additional information” text box.
-
15. Tax

-
Are you exempt from sales tax?
-
Toggle Yes if your organization is tax-exempt.

→ This will remove all sales tax-related fields from the setup. -
Toggle No to continue with sales tax options.
-
-
Do you want to collect sales tax?
-
Toggle Yes if you plan to collect sales tax on your course or event.

-
You’ll be required to select a tax code from Stripe’s tax code list for each pricing option in future steps.
-
Stripe will automatically calculate the appropriate tax based on the buyer’s location and selected code.
-
⚠️ Stripe Tax must be enabled and properly configured in your Stripe account to use this feature.
-
-
Toggle No if you are not collecting sales tax. → No additional tax setup will be required.
-

16. Registration Pricing - Sales Tax

- If you do not see the sales tax option, you either stated you were exempt or did not want to collect tax.
- If you do not see this option and want to collect tax return to previous page and toggle Yes to collecting tax
- If you selected yes to sales tax you will be asked if you want to apply sales tax to individual course pricing.

- Toggle Yes to activate stripe tax for individual course pricing
- Select the product code that best describes individual course pricing from the drop down menu. All codes are from stripe.
- If you are unsure of your product codes advise your accountant or tax adviser.
17. Bundle Pricing

-
Enter Pricing by Category and Tier
-
For each attendee registration category (e.g., Dental Hygienist, Dental Assistant, Dentist), enter the course price for every pricing tier (e.g., Early Bird, Regular, Late) that you previously selected.
-
⚠️ Important Note About Bundle Pricing Tiers
Unlike traditional event pricing—where prices typically increase as the event date approaches—bundle pricing may work in reverse.
With bundles, pricing can be more flexible and based on access duration or remaining content availability. For example:
-
-
💸 Early adopters might get a special introductory discount
-
💰 The price may then increase during the peak availability window
-
⏳ As the bundle nears expiration (fewer courses or less access time), you may lower the price again to reflect reduced value
-
This tiered strategy helps attract early interest, maximize mid-cycle revenue, and clear final sales before access ends.
-
Use “Set All” Buttons to Save Time
-
Click the “Set all [Tier] pricing to” button to automatically apply the same price to all categories for that tier. This saves time if the pricing is consistent across groups.
-
-
Membership Pricing (If Applicable)
-
If you’ve offered custom membership discounts, you’ll see additional fields next to applicable categories (like “AGD” in the Dentist section) to enter those custom prices manually.
-
If you choose a percentage-based membership discount, the system will automatically calculate the discount from the standard price.
-
If you chose a fixed discount, you won’t see a membership pricing field here since the discount will be deducted from the total during registration.
-
-
Clear All will remove all pricing entries across every pricing tier for that registration category.
Use this if you want to reset all entered prices and start fresh.⚠️ This action cannot be undone, so double-check before clearing your entries.
18. Registration Agreements
Use this section to include any custom policies or statements that attendees must either agree to or opt in/out of before completing registration.

By default, No is selected.
Select Yes if you want to add custom policies or statements for your attendees.

-
Use this section to include additional agreements that attendees must either agree to or opt in/out of before completing registration.
-
Required Agreement: Attendees must agree to the statement in order to register.
-
Opt in/out: Attendees will be presented with the option to either accept or decline the statement.
-
Common uses include policies for privacy, marketing communications, attendance expectations, or any organization-specific terms.
You can add multiple policies using the + Add another agreement/policy link.
Note: If “Yes” is selected, at least one agreement must be completed before continuing.
19. Marketplace Registration
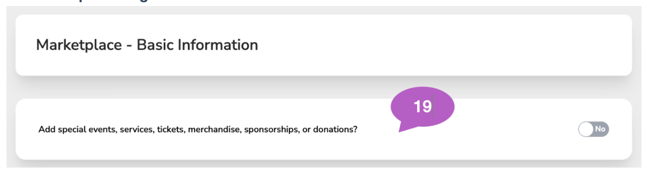
Need to add Market Place? Click the link below for marketplace registration instructions. You’ll be taken to a new page—just return here to continue the rest of the setup process.
More Info: How to set up Marketplace Registration
20. Layout

This step allows you to design and preview your event’s public registration landing page.
What you can do here:
-
A. Update Button Colors
Click the color boxes next to each label to change the corresponding button or text color. -
B. Upload a Banner Image
Click the top image area to upload a large background photo that will appear at the top of the registration page. -
C. Add a Secondary Image (optional)
You can upload a second, smaller image (such as a logo ). Click red X to remove image. -
D. Preview the Full Page
-
Click "Preview webpage layout" to see a non-editable version of the final registration page.
-
Click "Preview 'Register Now' Process" to walk through the attendee registration steps. Great way to see if you have your course and registration set up correct.
-
-
Preview Your Content


Scroll down to see how all your previously entered course/event information will display. -
Edit the Overview/Objectives
The course overview and learning objectives are editable directly from this page if any changes are needed. - Add Tags
Tags help improve searchability and visibility. You must add at least one tag. You can enter up to 10.
21. Bundle Overview - Agree to Terms and Conditions
-
Check both boxes to agree to the Terms of Service and Payout Terms and Conditions.
- You can click on the blue wording to open and review each set of terms before accepting.
-
These must be accepted in order to post your course and receive payments.

22. Advertising

-
Toggle Yes if you want CE Zoom to help promote your course.
-
Fill in your name, email address, and phone number (optional).
-
Then select any of the following ad options you are interested in, and a CE Zoom support member will reach out:
-
📩 Newsletter – List your course in our weekly newsletter.
-
⭐ Newsletter “Featured” – Highlight your course at the top of the newsletter.
-
📤 3rd Party Send – Custom email blast to CE Zoom’s entire database.
-
23. Posting Overview
This final screen provides a summary of your bundle details before posting.

Once complete click finish to post
