
Prior to adding courses to a conference, you must have first created the conference using the multi-course setup wizard.
Course Management

Skip quick links: Take me to Step 1 of adding a live course that is part of a conference
Understanding Icons on Course Management Screen
Part of a Conference
When you hoover over the icon, the conference the course is associated with will be displayed

Course Method/Delivery is Virtual

Part of a Paid Event

Course set up is Incomplete

Quick Links to the Course Wizard Navigation Menu Item
Use the links below to jump directly to specific sections of the Course Wizard. These shortcuts make it easy to reference or revisit a step without scrolling through the entire setup process. Whether you're editing an existing course or checking details before posting, these quick links help streamline your workflow.
Course Postings / Add On's - Course Posting Summary
Course Wizard - Basic Course Information
Course Wizard - Course Details
Course Wizard - Sponsor Information
Course Wizard - Contact Information
How to Add a Live Course
- From your Course Manager screen, click the Add a new course+ button in the top right corner.. This will launch the course creation wizard.

Course Type - Select Type
- Select Single Live Course – for in-person or virtual events that happen at a scheduled time with live attendance - then click continue

Course Type - Course Creation
There are 2 options:
- Select Create a new course from scratch – Start fresh and enter all course details manually.

- Select Create a course from your template manager to quickly duplicate a saved template and streamline course setup.

- Select a template to auto-fill your course with the saved template details

-
- Non-approved templates:
These are internal templates created by your organization that have not gone through a joint provider approval process or course verification process, all wizard fields will be editable. - Approved Joint Provider Templates:
These templates have been reviewed and approved through a joint provider partnership. To maintain compliance, certain sections of the course wizard will be locked and cannot be edited. If changes are needed in those locked areas, a new course must be submitted for approval.
Approved Joint Provider Templates allow the offering company to utilize the joint provider approval for up to one year from the approval date—without needing to pay joint provider fees for each posting. However, individual course postings are still required.
- Non-approved templates:
-
- Select a template to auto-fill your course with the saved template details
Course Type - Course Method
On this screen, you’ll define how your Single Live Course will be delivered
-
Select the course delivery method:
In Person – For courses held at a physical location.
Virtual – Live, online courses where participants engage in real-time through a video platform—just like an in-person class but conducted remotely.
In Person & Virtual – A hybrid format where the course is available both at a physical location and as a live, interactive virtual session. Attendees can choose how they prefer to participate. -
Indicate if the course is hands-on:
Toggle Yes or No depending on whether the course includes a hands-on component.
-
Enter the course title:
Type in a clear, descriptive title for your course. This is what participants will see.
-
Choose the course visibility:

-
Public – The course will be searchable and open for public registration.
-
Private – The course will only be accessible to those with the direct registration link.
-
Once everything is filled out, click Continue to proceed.
Return to Navigation Quick Links
Country & Industry
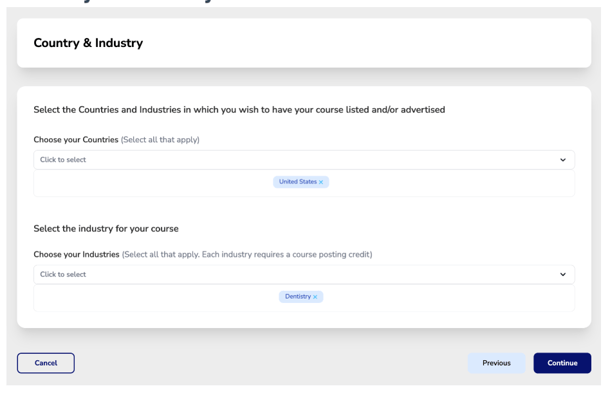
This section determines where your course will be listed and which professionals will be able to find it.
-
The system will automatically default to the country and industry set in your Company's My Account Settings - Country & Industries.
-
If you want your course to be advertised to additional countries or industries, you can select them here by clicking the dropdowns.
-
⚠️ Note: Each industry selected will consume one course posting credit.
Once your selections are complete, click Continue to proceed.
Return to Navigation Quick Links
Course Postings / Add On's - Course Posting Summary
This page summarizes the key details you've selected for listing your Single Live Course on CE Zoom. It provides a final review before moving forward and ensures transparency about course posting credit usage.
-
Review:
-
Method: How the course will be delivered (In Person, Virtual, or Both)
-
Countries: Where the course will be listed
-
Industries: The professional fields your course is targeting
-
Credits Required: The number of course posting credits needed based on selected industries
-
-
Check your available credits:
The system displays how many course posting credits your company currently has. -
If you do not have enough credits:
The system will alert you that more credits are required and guide you to purchase them directly within the course creation wizard.
- Click continue to be advanced to the pricing guide to purchase needed credits.

- We offering different options to fit your needs
-
Pay As You Go
-
Use the plus (+) and minus (–) buttons to select how many individual course posting credits you need.
-
Click “Add to Cart” once your total is set.
Memberships
-
-
Choose the package that fits your needs (10, 15, 20, or 30 courses/year).
-
Select whether you'd like to pay in full or choose a 12-month installment plan (note: 10% fees apply to installments).
-
All memberships are auto renewing annual subscriptions and include the selected number of course postings per year.
-
- Click continue to be advanced to the pricing guide to purchase needed credits.
Once everything looks correct and you have enough credits, click Continue to proceed.
Click the cart icon in the upper right corner to review added items..
-
-
-
Click Continue to move to the Add-Ons section.
-
Here, you can select any optional services (like AGD joint providership).

-
If additional credits are required for your selections, you’ll be prompted to add them.
-
-
Click Continue to proceed to the payment screen.

-
Once payment is processed, you can continue building and adding your event.
-
Return to Navigation Quick Links
Course Postings / Add On's - Add On's
This screen displays any additional posting options (add-ons) that may be available for your selected course and industry.

-
Currently, the Joint Provider add-on is only available for Dentistry courses.
AGD-PACE (Academy of General Dentistry – Program Approval for Continuing Education) is a program that recognizes CE courses for AGD credit. If your organization isn’t already an AGD-PACE provider but wants your course to count for AGD credit, you can request CE Zoom to serve as your Joint Provider.- One-time: You are offering this course only once and you want it to be approved for AGD CE credit.
-
Annually: You plan to offer the same course multiple times throughout the year (repeated sessions).
-
-
You plan to offer the same course multiple times throughout the year (repeated sessions).
-
Once the course is reviewed and approved following AGD protocol, you’ll receive an approved course template.
-
You can then offer unlimited identical sessions of that course for 365 days without paying additional AGD joint provider fees for each one.
-
Course credits still apply for every offering during that year.
-
-
If your selected course industry is not Dentistry, you will see a message stating: "Joint Provider is not available."

-
No action is needed—simply click Continue to proceed with your course setup.
Return to Navigation Quick Links
Course Wizard - Basic Course Information

1. Course Association:

What type of course are you adding?
- Single course: leave the default selection as “Single course (Not part of a multi-course/event).”
- Part of a conference: Select the conference this course is associated with.
- If you are adding the course through the Conference Wizard, the associated conference will be automatically selected for you.
-
-
If it is not selected: Click inside the Course Association field to expand the dropdown menu. This will display all multi-course events or conferences created under your account.
From the list, select the conference that is associated with this course.
If the course is not part of a conference or multi-course event, leave this field set to "Single course (Not part of a multi-course/event).
-
2. Course Date, Time & Time Zone

-
Select the course date using the calendar picker.

-
Click on the desired hour, minute, and AM/PM to set your time.

-
Choose the appropriate time zone for where the course will be held or hosted virtually. The time zone will be auto selected according to the address under the companies my account settings.

3. Total Credit Hours
-
Use the ➕ plus and ➖ minus buttons to adjust the hours and minutes.
-
You can also click inside the number fields and type in the time manually.
4. CE Credit Type (Per Industry)

-
Select the Type of CE Credit being issued from the dropdown for each industry.
This field is specific to each industry you are offering the course in
5. Course Presenters
-
Click inside the “Presenters” field to reveal a drop-down menu of all available presenters in the CE Zoom system, or begin typing a name to search.

-
All selected names will be considered co-presenters.
- If any presenter info is incomplete, a notification will appear.

- Click View/Edit Details to edit and update the presenter's bio and qualifications

-
Edit Presenter – Instructions

- Click View/Edit Details to edit and update the presenter's bio and qualifications
Email Address, First Name, Last Name:
This is not editable.
Title (Optional):
Include credentials or professional titles (e.g., DDS, RDH, MPH) if applicable, if prepopulated you can updated to display preferred credentials
Photo (Optional):
Upload a clear headshot of the presenter to personalize their profile.
If the presenter already has a profile picture in their CE Zoom account, that image will be used by default.
You can update the photo for this course by clicking Upload.
The uploaded image will be unique to this course and will not overwrite the presenter’s main profile picture.
Presenter Bio:
Enter a brief, professional summary of the presenter’s background, experience, and expertise.
If the presenter already has a bio saved to their CE Zoom account, it will automatically populate in this field.
You are free to edit or update the bio as needed for this course.
Any changes made here will be unique to this course and will not affect the presenter’s main profile.
Presenter Qualifications Toggle:
If the presenter’s qualifications are already included in the bio, toggle this option to Yes.
If qualifications are not listed in the bio, leave the toggle off and enter them in the Presenter Qualifications field below.

-
-
Once complete, click Save Presenter to finish creating the profile.
-
6. Add New Presenter / Presenter not Found
- If the presenter is not found in the system, click “Add new presenter” to create a new profile within CE Zoom.

⚠️Only use this option if the presenter does not appear in the search results. Creating duplicate presenter accounts makes it difficult for presenters to manage their courses and CE history across the platform. - Enter your presenter's email, and see if the system finds a match:

Email Match: If the system finds a match for the presenter's email:
- Click Load presenters Information.
- Make any updates and fill in any missing information

Email NOT Recognized: If the system does not recognize the email address you enter, you’ll need to complete the presenter form.
This will create a presenter profile on their behalf within CE Zoom.
The system will automatically send them a welcome email with instructions to activate their account.
Once activated, the presenter will be able to log in, view their profile, and access details about the courses they are assigned to.
🔔 Be sure to enter the correct email address so the presenter receives the activation link and course access.
Return to Navigation Quick Links
Course Wizard - Course Details
7. Topic (will be asked per industry)

-
This is a single-select field.
-
Choose the primary subject your course focuses on.
If your course covers multiple distinct topics, consider creating a Multi-Course Event, where each session can have its own topic for accurate tracking.
8. Providers
-
Select all providers that are recognized or approving entities for this course.
-
This ensures the CE activity is considered credible and aligns with industry standards for professional competency.
- If you chose AGD-PACE Joint Providership as an Add On, AGD-PACE will be auto selected as a provider and can not be removed.
⚠️ Disclosure:
The terminology used here is intended to apply across industries. Selecting a provider does not imply official accreditation or approval in all cases. It simply records which entity is overseeing or regulating the CE activity.
9. AGD-PACE Subject Code
-
If you selected AGD-PACE as a provider or chose AGD Joint Provider, this field will appear.
-
Select the appropriate AGD subject code that best fits your course content from the dropdown list.
10. Audience
-
Choose who the CE course is intended for (e.g., Dentists, Dental Hygienists, Assistants, etc.).
-
This helps ensure the course is promoted to and visible by the right professional groups.
11. California Provider Number (Optional)
- If your course is approved by California, enter your state-issued course provider number in this field.
-
If not applicable, leave this blank.
12. Overview & Learning Objectives
Use this field to provide a clear summary of the course content along with specific learning objectives.
-
The overview should describe what the course will cover and what attendees can expect to learn.
-
Include 3–5 measurable learning objectives that outline what participants will be able to do after completing the course.
These objectives are often used for CE validation and must align with the course material and CE credit being issued.
13. Bibliography / References
Enter citations or links to research, publications, or current evidence that support the content of the course.

-
Include reputable sources that validate the claims or practices presented.
-
This is especially important for clinical or evidence-based content and may be required by accrediting bodies.
14a. Venue Details (For Live In-Person)
Use this section to enter the location of your in-person course.

-
Venue Name – Enter the name of the facility or location hosting the course.
-
Address – Fill in the street address where the course will take place.
-
Country, State/Province, City, Zip – Complete all applicable location fields for accurate mapping and attendee information.
-
Course Room / Suite (Optional) – Include the specific room, suite, or floor if applicable for larger venues.
Accurate venue details help ensure participants know exactly where to go and allow CE Zoom to display correct info on course listings.
14b. Max Attendance
Set a limit on how many people can register for your course.

-
Use the + / – buttons to increase or decrease the max number of attendees.
-
If there is no limit, check the "Unlimited" box.
Limiting attendance helps with capacity planning and ensures a manageable group size for hands-on or interactive sessions.
15. Course Prerequisites
Use this section to indicate whether your course has any entry requirements for participants (e.g., educational background, licenses, or prior coursework).

-
By default, the toggle is set to "No", meaning no prerequisites are required.
-
If there are prerequisites, switch the toggle to "Yes" to activate the text field.
-
In the field provided, clearly describe any requirements such as:
-
Minimum education level
-
Licensure or certification
-
Completion of specific prior courses
-
This ensures participants know if they're eligible to attend and helps maintain course quality and relevance.
16. Conflict of Interest Disclosure (if applicable)
Use this section to declare any financial relationships or arrangements that may present a conflict of interest in the context of this continuing education presentation.

-
Required by many accrediting bodies, this disclosure helps ensure transparency and credibility.
-
Click the dropdown and select the appropriate option:
-
No – No financial arrangement has been made with a corporate organization involving the presenter, company, or their family members.
-
Yes – One or more financial arrangements have been made with a corporate entity related to the presenter, company, or anyone involved in the educational content.
-
If you select "Yes":
You must fill out the text field provided.
-
Describe the names of the organizations involved.
-
Explain the financial interest or relationship.
-
Include who the relationship is with (presenter, company, content contributor, or family member).
-
-
-
This disclosure applies to financial support, sponsorship, or grant monies tied to course creation, content, or delivery.
17. Disclaimer
This section outlines the default disclaimer that will be included in your course listing.

-
The pre-filled disclaimer content, shown in blue and black text above the editor, is automatically included to inform participants about the scope and ownership of course content.
-
This protects CE Zoom, the presenters, and your organization by clarifying that:
-
Views expressed are those of the presenter.
-
Participants are responsible for applying the material appropriately.
-
Course content is protected and may not be copied or distributed.
-
Would you like to add to the disclaimer?
-
By default, this is set to “No.”
-
If you would like to include an additional custom disclaimer specific to your course or organization:
-
Toggle to “Yes”
-
Use the editor field to enter your custom language.
-
Your added content will appear in addition to the default CE Zoom disclaimer.
18. Webinar/Conference Link (if offering course virtually)

-
Choose the Link Type
-
Select “Direct joining link only” if attendees can join without a passcode and enter the webinar conference joint link.

-
Select “Joining link with a passcode” if the attendee needs a passcode and enter the webinar conference joint link and passcode.

-
-
Add Optional Joining Instructions
-
Use the text editor to provide any additional information attendees may need, such as:

-
How to log in
-
What to expect
-
Troubleshooting tips
-
-
-
Set Maximum Attendance

-
Use the plus (+) or minus (–) buttons to set a limit (default is 500).
-
Or check the “Unlimited” box to allow unlimited participants.
-
-
Schedule Automatic Webinar Reminders

-
You can select up to two notification times to automatically remind attendees of the event.
-
Toggle “Yes” or “No” for each time option:
-
24 hours prior
-
1 hour prior
-
30 minutes prior
-
15 minutes prior
-
-
19. Additional Course Notes / Details to Share with Attendees
Use this section to include any extra information that attendees should know about the course.

-
This could include:
-
Parking instructions
-
Dress code (e.g., lab coat required)
-
Required materials or supplies
-
Directions to the venue
-
Check-in time or registration reminders
-
-
By default, this section is set to “No.”
-
Toggle to “Yes” if you’d like to include any additional notes.
-
Then, use the text editor to add your message.
-
These notes will be shown to registrants and included in their course details.
Return to Navigation Quick Links
Course Wizard - Sponsor Information
20. Sponsor Information
Use this section to indicate if the course is being sponsored and how you'd like to present the sponsor's information.

- Is this course sponsored?
-
The toggle is set to “No” by default.
-
Switch to “Yes” if you want to include sponsor information.
-
- Display Options:
-
Text – Only displays the name of the sponsor(s) as entered in the input field.

-
Logo – Allows you to upload the sponsor’s logo image and include their name (ideal for marketing or branding).

-
Return to Navigation Quick Links
Course Wizard - Contact Information
21. Contact Information Instructions
Use this section to identify the primary contact for the course and manage who should handle specific support questions from attendees.

-
Name and Email of Person Adding the Course
This will be the default contact for all course-related support unless otherwise specified. - Default Settings:
-
All categories below are automatically set to “Yes”, meaning the person listed as adding the course will be the contact for:
-
General course questions (Course Coordinator)
-
CE Certificate confirmation
-
Re-issuing verification codes
-
Questions about handouts
-
Replay/on-demand course requests
-
Cancellations and refunds
-
- To Assign a Different Contact:
-
Toggle to “No” for any category where a different person should handle that inquiry.

-
Then, enter the contact name and email of the appropriate person.
-
This ensures attendee questions are directed to the right person for a faster, more accurate response.
Return to Navigation Quick Links
Course Wizard - Additional Info
22. Additional Info Settings
Use this section to customize how your course will function on CE Zoom. All toggles are set to the default values shown in the screenshot.

Descriptions of Each Option:
-
Offer as Elite Course (Default: No)
Toggle to Yes if this course is part of CE Zooms Elite tier offerings (if applicable to your account type). -
NPI Required (Default: No)
Toggle Yes if you require attendees to enter their National Provider Identifier in order to receive their CE Certificate as required by the Sunshine Act for manufacturers. -
Automatically Confirm Attendees (Default: Yes)
When enabled, CE Zoom will automatically confirm attendance without manual review as long as the attendee has successfully verified the course with the correct course completion verification code. -
Can CE Zoom Hand Out the Registration Link? (Default: Yes)
Allows CE Zoom to share your registration link with users who contact support about your course. -
Can CE Zoom Reissue Verification Codes? (Default: Yes)
Let CE Zoom support resend verification codes to attendees upon request. Please note CE Zoom can only re-issue verification codes if the attendee's attendance has been confirmed or we have access to attendance records and attendance times to verify they attended your event and are eligible to receive full credit. -
Will This Course Be Replayed or Turned Into a Self-Study / On-Demand Course? (Default: No)
If you plan to convert this live course into an on-demand format, toggle this to Yes and add any additional information for the attendee to find the self-study course.
-
Will Handouts Be Issued? (Default: No)
Toggle to Yes if you will provide downloadable handouts to attendees, add the handout notes, and upload the handout file.
Return to Navigation Quick Links
Certificate Manager
23. Course Completion Certificate
Use this screen to select which certificate will be issued to attendees upon successful course completion.

Selecting a Certificate:
-
-
Use the radio button on the left to select one certificate from the list.
-
Once selected, the certificate name will appear in a purple bar at the top of the table to confirm your choice.
-
Manage Certificate Options:
-
-
Click Manage Certificate to view or edit the layout, wording, provider logos, or settings for that certificate.
-
Add a New Certificate:
-
- If you do not have a saved certificate or want to create a new one, click “Add new certificate +” in the top right corner.
More Info: How to create a new Course Certificate
Search & Filter:
-
-
Use the search bar to quickly find certificates by name.
-
Return to Navigation Quick Links
Test Manager
24. Course Knowledge Assessment Setup
Use this screen to assign or create the post-course knowledge assessment test for your CE activity. CE Zoom will automatically issue, grade, and record the test results for participants.

Will you be managing your tests through CE Zoom?
-
-
Yes – Enables you to assign or create a test that will be automatically handled by CE Zoom.
-
No – Select this if you are administering tests outside the CE Zoom platform (e.g., on paper or through a third-party system).
-
Selecting a Test:
-
-
Use the radio buttons to select the test you’d like to assign to this course.
-
The selected test will be highlighted in the “Test selected” purple bar above the table.
-
Managing Tests:
-
-
Click Manage Tests to view, edit, or change status of a test
-
Add a New Test:
-
-
Click “Add Test +” if you don’t have an existing test or would like to build a new one from scratch.
-
Active / Inactive Tests
-
-
By default, only Active tests are displayed in the list below.
-
To view previously created but inactivated tests, click the “Inactive” tab.
-
You can select an inactive test to use for your course—just make sure to review it to ensure it is relevant.
-
Return to Navigation Quick Links
Survey Manager
25. Course Evaluation Setup
Use this section to assign a course evaluation survey that attendees will complete after your course.
Will you be managing your surveys through CE Zoom?

-
-
Select Yes to attach an evaluation survey directly within the CE Zoom platform.
-
Select No if you are not using CE Zoom for survey management (external or no survey).
-
Survey Requirement:

-
-
Choose if the survey is Required (participants must complete it to receive CE credit) or Optional (can be skipped).
-
The default setting is Required.
-
Selecting a Survey:
-
-
Use the radio buttons to choose from your existing active surveys.
-
Once selected, the survey name appears in the purple bar, confirming your selection.
-
Add or Manage a Survey:
-
-
Click “Add Course Survey +” to create a new survey from scratch or duplicate an existing one.
-
Use the “Manage Survey” button to view, edit, or change status.
-
Search & Status Filter:
-
-
Use the search bar to quickly locate a survey by name.
-
By default, only Active surveys are displayed.
-
Click the Inactive tab to view inactive surveys — these can still be selected and assigned if needed.
-
At the end of the course setup:
-
Click Save as Draft if the course is incomplete or requires further edits later.

💡 You can return to draft courses at any time to complete and post them when ready.
-
Click Post if all required fields are completed and the course is ready to go live.

Repeat this process for each live course being offered as part of the conference.