
Why Use CE Zoom’s Provider Statement & Logo Manager?
You work hard to obtain and maintain your provider approvals, and we know how important it is to follow the strict guidelines for logo placement and approval statements. CE Zoom’s Provider Statement & Logo Manager takes the hassle out of tracking renewal periods and ensures your certificates remain compliant—automatically.
With this feature, CE Zoom:
- Tracks renewal periods for your provider approvals
- Automatically updates the logo and approval statement on each issued CE certificate
- Eliminates the need to create new certificates each time your approval is renewed
This is especially valuable for self-study courses, where course listings often extend beyond a single approval period. Instead of relisting courses or manually updating certificates, CE Zoom ensures compliance by seamlessly managing provider logos and statements—as long as you keep your approved provider details up to date.
Let CE Zoom handle the details so you can focus on delivering quality education!
Accessed from the Navigation Menu
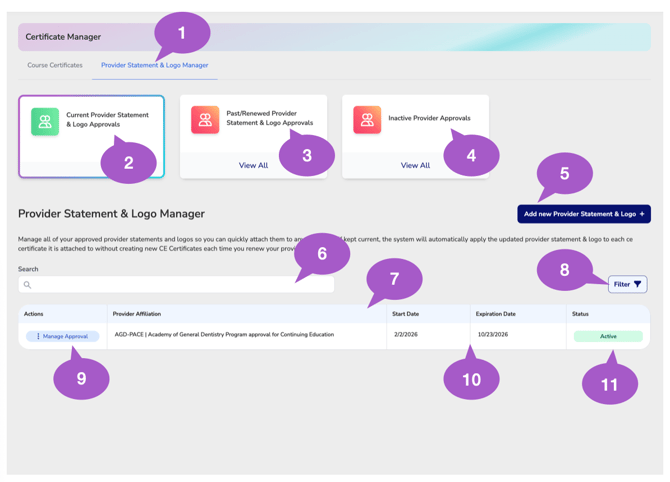
1. Provider Statement & Logo Manager Tab
Access the Provider Statement & Logo Manager to create, manage, renew, and organize approved provider statements and logos.
2. Current Provider Statement & Logo Approvals
Displays provider statements and logos that are currently active and available for certificate use.
3. Past / Renewed Provider Statement & Logo Approvals
View provider statements and logos that have been renewed, replaced, or moved into historical records.
4. Inactive Provider Approvals
Displays provider statements and logos that are inactive and no longer available for selection.
5. Add New Provider Statement & Logo
Click Add New Provider Statement & Logo to create a new approved provider record for certificate use.
6. Search Provider Records
Use the search bar to quickly locate provider statements and logos by provider name or affiliation.
7. Provider Statement & Logo Table
Displays all provider records and their associated approval details, dates, and statuses.
8. Filter Provider Records
Use filters to narrow provider records based on status or other available filter options.
9. Manage Approval
Click Manage Approval to view, edit, renew, update, or manage an existing provider statement and logo.
10. Provider Approval Dates
Displays the active date range for the provider approval, including the approval start date and expiration date used to determine when the provider record is valid.
11. Provider Status
Displays whether the provider statement and logo are currently Active or Expired.
Accessed from the Course Wizard
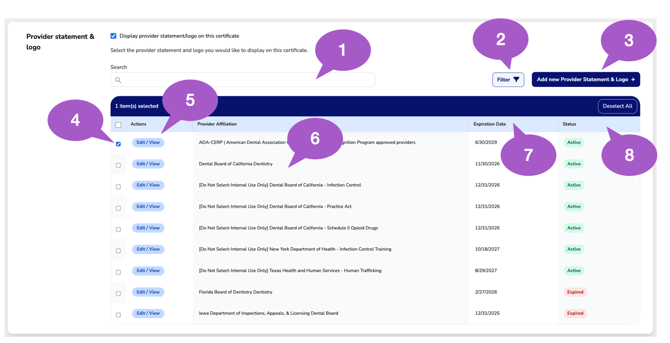
1. Search Provider Records
Use the search bar to quickly locate provider statements and logos by provider name or affiliation.
2. Filter Provider Records
Use filters to narrow provider records based on status or other available filter options.
3. Add New Provider Statement & Logo
Click Add New Provider Statement & Logo to create a new approved provider record for certificate use.
4. Provider Selection Checkbox
Use the checkbox to select which provider statements and logos should be displayed on the certificate. Multiple providers can be selected if needed.
5. Edit / View
Click Edit/View to view, edit, renew, update, or manage an existing provider statement and logo.
6. Provider Affiliation Column
Displays the names of all stored provider affiliations available for selection and management.
7. Provider Expiratin Dates
Displays the expiration date associated with each provider affiliation. Keeping approval periods updated helps ensure the correct provider statement and logo are applied based on active dates and course earn dates.
8. Provider Status Column
Displays the current status of each provider affiliation so you can quickly identify whether a provider is active or expired.