
Understanding the CE Certificate Manager Screen from inside the course creation wizard
-
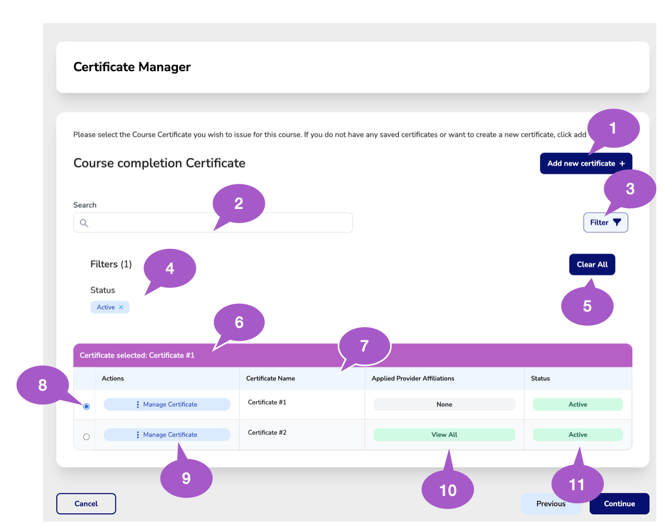
Add New Certificate
Select Add New Certificate to create a new CE certificate template without leaving the Course Wizard.Once you've finished creating the certificate, you'll automatically return to the CE Certificate Manager. Newly created certificates are not automatically selected, so be sure to select the certificate you just created before continuing with your course setup.
-
Search Certificates
Use the search bar to quickly locate certificates by name or keyword.
-
Filter Certificates
Click Filter to narrow your certificate list based on available filtering options.
-
Applied Filters
View active filters currently applied to the certificate list. Active filters can impact which certificates are displayed.
-
Clear Filters
Click Clear All to remove all applied filters and return to the full certificate list.
-
Currently Selected Certificate
The Currently Selected Certificate banner displays the certificate that is currently assigned to the course and will be attached to attendee CE certificates when the course is saved.
The selected certificate is not automatically displayed at the top of the certificate list. This banner allows you to quickly confirm which certificate is currently selected.
To locate the selected certificate in the list, scroll until you find the certificate with the selected radio button, or use the Search feature to quickly locate it.
-
Certificate List Table
The Certificate List Table displays all saved CE certificates, including certificate details, provider affiliations, and current statuses.
By default, only Active certificates are displayed. To view Inactive certificates, clear the default filters or apply a filter to display inactive certificates only.
-
Selected Certificate
Use the radio button to select the certificate you want to issue for this course.
The currently selected certificate is identified by the highlighted radio button. To choose a different certificate, simply select its radio button. Remember, only one certificate can be selected at a time, and the selected certificate will be attached to the course when it is saved.
-
Manage Certificate
Click Manage Certificate to open, edit, and manage an existing certificate.
Important: Once a CE certificate has been issued to an attendee, that certificate can no longer be edited to preserve the integrity of previously issued records. If changes are required, create a new certificate with the updated information.
If the updated certificate needs to be assigned to a course that is no longer editable, please contact help@cezoom.com for assistance. Please note that administrative fees may apply when updating courses that are no longer eligible for self-service editing.
-
Applied Provider Affiliations
The Applied Provider Affiliations column displays the provider approvals and accreditations currently associated with each certificate.
Select View All to review every provider affiliation applied to the certificate, allowing you to verify which approvals and accreditations will appear on the certificate.
-
Certificate Status
The Certificate Status column displays whether each certificate is currently Active or Inactive.
By default, only Active certificates are displayed in the certificate list. To view Inactive certificates, clear the default filters or use the Filter option to display inactive certificates.
Key Features of CE Zooms Certificate Manager:
- Customize Certificates – Add your logos, provider statements, disclaimers, and signatures to match your organization's branding and approval requirements.
- Seamless Provider Approval Management – Automatically applies the most current provider logo and approval statement without manual updates.
- Personalized Certificates for Each Attendee – Auto-populates attendee name, license number, course title, dates, verification codes, and more, preventing unauthorized alterations and plagiarism.
- Error Prevention & Compliance – Ensures certificates meet provider approval guidelines, reducing the risk of issuing non-compliant CE credits.
- No More Lost Certificates – Attendees can easily access and retrieve their CE certificates anytime, eliminating the hassle of lost or misplaced documents.
With CE Zoom’s CE Certificate Manager, you can save time, ensure accuracy, and maintain compliance—all while providing a seamless experience for both providers and attendees.